
You can read part one here Awkun the Prototype (Part 1)
Excited from a quick and fulfilling success with the first version of Awkun. I decided it was time to move on to upgrades. After all, despite being functional. The first version was mostly just a kit with custom code. I was also familiar enough with Arduino, Voltage, Soldering, and, Wiring. I felt it was time I could start to personalize the kit.
Power
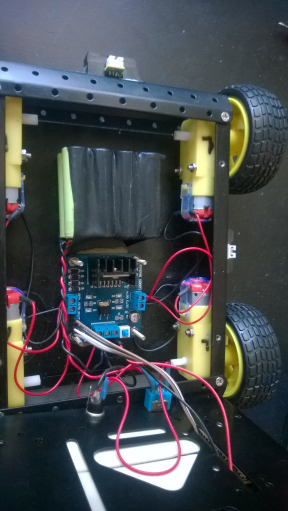
The first update was undoubtedly the most important. The batteries! The kit provides you with a 6x AA battery pack totaling 9v (volts) / 6a (amps) / 6000 mWh (mil-watt hours). With the current design, store-bought non-rechargeable energizer batteries lasted about 72 hours. Functional, but very costly if i was going to plan on letting it run 12+ hours a day. Also the robot changing its own batteries was pretty much out of question.
After a few days of searching battery types i settled on a Ni-MH 12v / 12a / 2200 mWh 5×5 rechargeable battery pack. Just for the sake of transparency. This choice was due to local options more than quality / performance. Also, my local Orvac's did not have a 9v 9a battery that fit my size requirements.
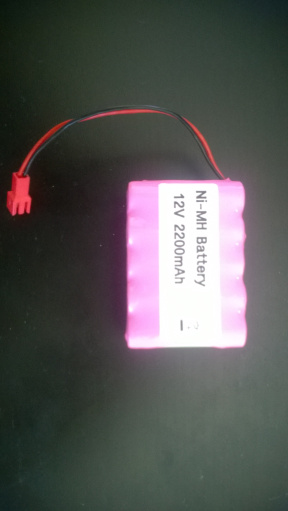
The 12v battery pack contained 10x AA rechargeable batteries at 1.2v / 1.2a each. Removing 2x batteries would leave me with a 9.6v / 9.6a / 1760 mWh 4×4 pack. A big hit to mWh’s compared to non-rechargeables for sure. However, it fit the space i had, 0.6v was a safe voltage jump, and, it was rechargeable. Also, by comparison. An extra 3.6a is great for growth!
Vision
The next upgrade i had in my sights was vision. The Ultrasonic sensor was effective. However, it needed pan / tilt. Further more, i needed a visual way to execute programmable commands. The simple ranging scale that the Ultrasonic sensor provided was nowhere near enough for this.
After research i found a basic color hue detection board. It was pretty close to what i was looking for but the effective range it could see was much too limited for my needs. After talking with a close friend. He showed me the PixyCam, a 50fps color hue detection camera board that was on Kickstarter. The project was funded and had already released their version 1.0 boards! After searching Amazon I even found one of the newer boards (version 1.2) for sale!
The range on the PixyCam is great (about 20x the distance of the Ultrasonic sensor). Better yet, 50fps is enough to keep up with moving objects! After continued research I found the URM37 (version 1.2) industrial quality Ultrasonic sensor. It had roughly 2x the range of the previous sensor as well as the ability to read the temperature of whatever it was reflecting off of. I ended using superglue to attach the URM37 and the PixyCam together.
However, initial testing with the pan / tilt servos proved that objects that where small, and, near the wheel base could be missed. This might result in getting stuck, or, turned around. I also could not tell if it’s safe to back up or turn. To fix this, I added 4x Sharp IR (infra-red) sensors. They were placed in front, back, and, both sides. While the range was about the same as the original Ultrasonic sensor. It was enough to overcome the issues with just using the pan / tilt servos.
Speech
The final upgrade i wanted to build for this version of Awkun was a voice. After all, what is a Robot that can’t speak? An inanimate object is what it is!
Researching, i found a rather large amount of speech processing chips. Most seem to use an actual human voice. Very cool, from male, and, female, to, child and elderly. However, not really what i was looking for. What i really wanted, at least for my first voice. Was that techno sounding voice from speak and spell. The speech for the speak and spell was generated using a phonic engine.
The phonic engine was originally based on a chip designed to reproduce music tones, not speech.
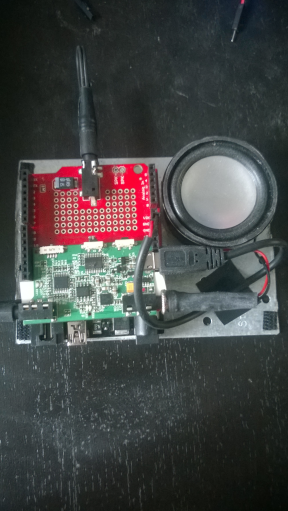
After more research online i came across the SpeakJet phonic processing chip. Even better the chip had already been packaged into a nice shield courtesy of Spark Fun.
Of course, in my haste, erm excitement. I forgot to order a matching speaker for the shield. Thankfully, for the most part a speaker is a speaker. Provided you match the ohms your fine. After, re-purposing a USB AM/FM radio. I “found” a speaker that worked.
Much to my amazement, after testing, i found the nice packaged shield did not contain an equalizer. Though it did have a volume nob and you could hear the voice. It was much too quite when the motors where running and the robot was in motion. A quick visit to my local Radio Shack and i found a simple enough equalizer (for a cell phone) to raise my audio well above the sound of the motors. Naturally, i removed the silly plastic casing the equalizer came in. For science!
I was pretty shocked to find out there was no pre-existing libraries for working with the SpeakJet chip. So out of necessity I created my own using the original spec-sheet for the chip. It’s a WIP so for now, it’s mono tone and the speed is fixed. However, it speaks, it beeps, it boops and it can make annoying modem sounds. Everything a growing robot needs!
I have to admit, despite being a lot of work and frustrating at times being that my background is software engineering & development, not hardware engineering or chip design. I’m still extremely excited about working on Awkun. It’s been one of my life long dreams to build Robots and I’m now in a position that I’m able to do it and it’s fucking awesome.